Canon MAXIFY iB4120 Wireless Small Office Inkjet Printer Manual del usuario
Página 2
6
Windows PC
1
b
c
Google Cloud Print
AirPrint/Google Cloud Print
a
4
5
7
8
6
a
b
2
3
USB
4
5
2
3
a
b
6
a
b
a
b
a
b
a
b
a
b
b
4
b
b
c
a
a
a
ES
EN
ES
EN
ES
EN
ES
EN
ES
ES
ES
EN
EN
EN
ES
EN
ES
EN
ES
EN
ES
ES
EN
EN
ES
EN
ES
EN
ES
ES
EN
EN
ES
EN
ES
ES
EN
EN
ES
ES
EN
EN
Se puede acceder al
Manual en línea
desde el sitio web.
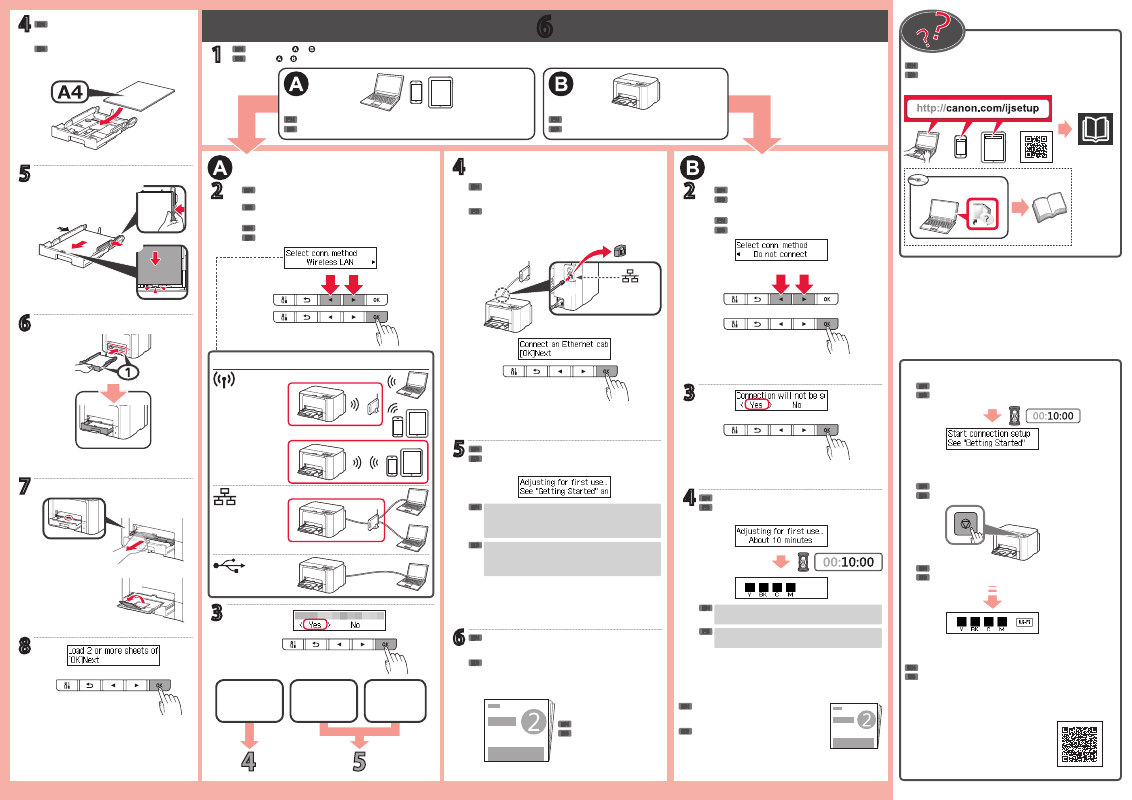
Para conectar la impresora a un PC, teléfono inteligente o tableta
Siga los pasos de la
Guía de inicio 2
para realizar las
conexiones e instalar el software y después continúe con
la configuración de la impresora.
Guía de inicio 2
Pulse el botón
Parar (Stop)
.
Siga las instrucciones que aparezcan en pantalla.
Si aparece la pantalla anterior, se ha completado la configuración de la
impresora.
Espere hasta que aparezca la siguiente pantalla.
Conexión LAN
cableada
Conexión USB
Conexión LAN
inalámbrica
Cargue varias hojas de papel normal A4 con el
lado de impresión hacia abajo.
También se puede cargar papel tamaño Carta.
Para conectar la impresora más tarde
LAN inalámbrica
Método de conexión
LAN cableada
Retire la tapa del conector de LAN cableada. Conecte la
impresora al router con un cable Ethernet y después pulse
el botón
OK
.
Asegúrese de que aparezca la siguiente pantalla.
Conexión LAN cableada
• Cuando haya finalizado los ajustes iniciales se imprimirá una
página de patrón.
• Para usar solo AirPrint o Google Cloud Print, vaya a
"AirPrint/Google Cloud Print".
Asegúrese de que la pantalla cambie como se muestra
a continuación.
Parte posterior
Utilice el botón
[
o
]
para seleccionar un tipo de conexión
entre los métodos que se muestran a continuación.
Pulse el botón
OK
.
Consulte o en función de cómo va a usar la impresora.
Utilice los botones
[
o
]
para seleccionar
No
conectar (Do not connect)
.
Pulse el botón
OK
.
Para reanudar la configuración, consulte
"PC (Windows/Mac OS)" en la
Guía de
inicio 2
, y después realice las conexiones e
instale el software.
Cuando haya finalizado los ajustes iniciales se imprimirá
una página de patrón.
The
Online Manual
is accessible from the website.
To connect the printer to a PC, smartphone or tablet
Follow the steps in the
Getting Started 2
to make
connections and install software, and then continue the
printer setup.
Getting Started 2
Press the
Stop
button.
Follow the on-screen instructions.
If the screen above appears, the printer setup is complete.
Wait until the following screen appears.
Wired LAN
connection
USB connection
Wireless LAN
connection
Load several sheets of A4 plain paper with the
print side facing down.
Letter size paper can also be loaded.
To connect the printer later
Wireless LAN
Connection method
Wired LAN
Remove the cap on the wired LAN connector. Connect
the printer to your router with an Ethernet cable, and then
press the
OK
button.
Make sure the following screen appears.
Wired LAN connection
• After initial adjustments are finished, a pattern page is
printed.
• To use only AirPrint or Google Cloud Print, proceed to
"AirPrint/Google Cloud Print".
Make sure the screen changes as below.
Back
Use the
[
or
]
button to select a connection type from
"Connection method" shown below.
Press the
OK
button.
Refer to either or depending on how you will use the printer.
Use the
[
or
]
button to select
Do not connect
.
Press the
OK
button.
To resume the setup, see "PC (Windows/
Mac OS)" in the
Getting Started 2
, and
then make connections and install software.
After initial adjustments are finished, a pattern page is
printed.