Componentes del sistema, Opciones del modelo 200 – Retrotec Spec-DucTester 200-SP200 Manual del usuario
Página 4
CFM
10
100
1,000
10,000
m
3
/hr 17
170
1,700
17,000
Open
Mid
Low
Opciones del Modelo 200
Field Calibration Plate para
verificar que el sistema se encuentre en
condiciones optimas de trabajo. #DU159
Air Current
Tester.
#AC107
US200 Door Panel
para recintos muy
hermeticos #AL214
Grill Mask para sellar
los registros.
#GR109 para la caja con 3.
Pressure Pan para
usar como un Powered Flow
Hood #PP105
Los tres Range Rings (incluidas en el sistema) permiten medir ductos muy herméticos hasta ductos con un gran número
de fugas. La calibración acata con los requisitos de RESNET, ASTM E779-10, EN 13829, CGSB 149.10, ATTMA TS-1.
(Flow at 50 Pascals)
www.retrotec.com Support:(604)732-0142 Sales:(855)738-7683 Made in Everson, WA USA
Página 4 de 4
Cada sistema cuenta con guías detalladas
(QuickGuides) y videos que muestran paso
a paso cómo utilizar el equipo.
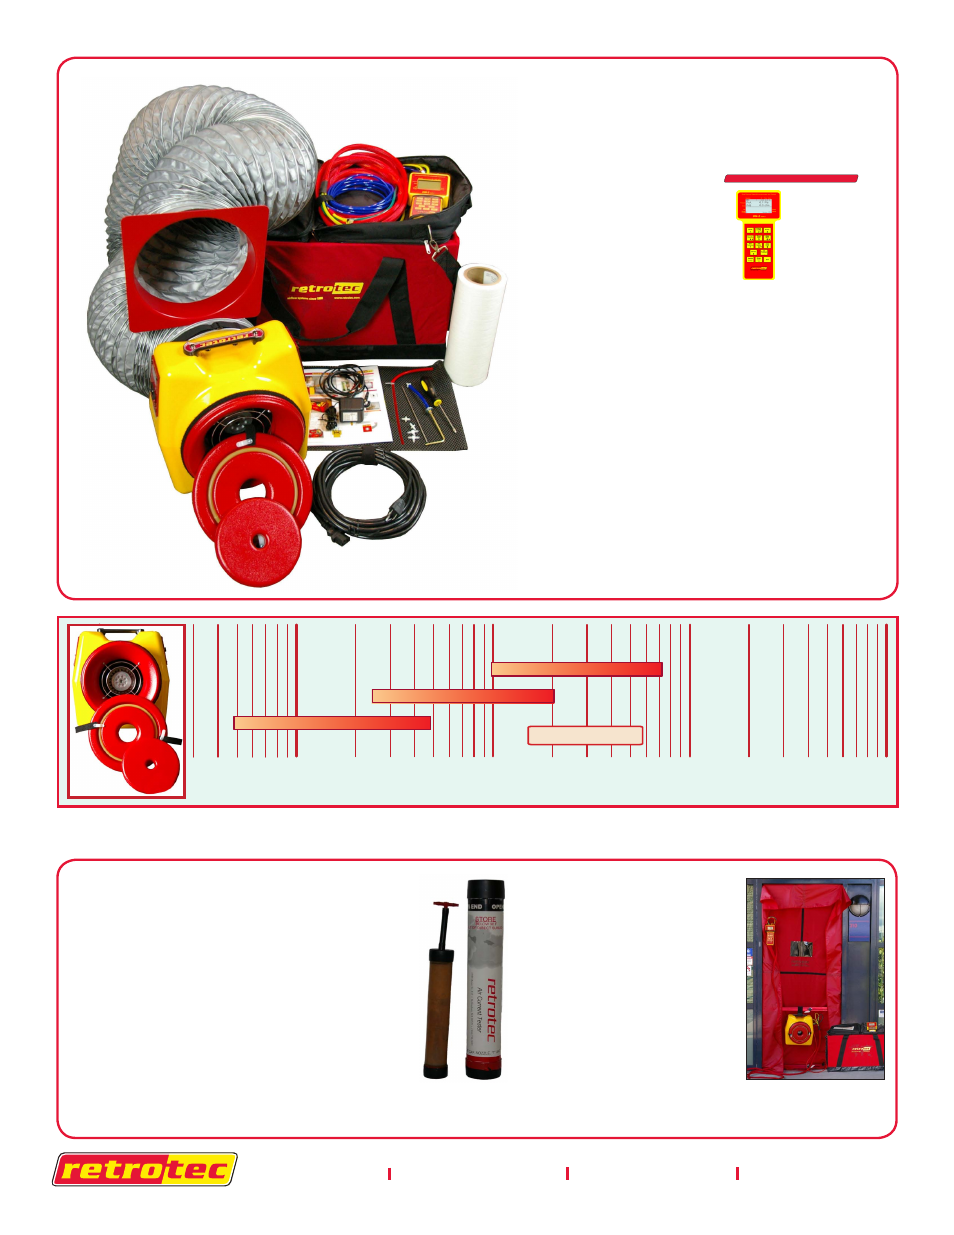
Componentes del Sistema
Incluye
1. Model 200 calibrated fan, 2. Mid-Range Ring,
3. Low-Range Ring, 4. 25 ft power cord, 5. Color coded
tubing kit with Static Pressure Probe, 6. Custom case,
7. Grill Mask (also comes in case of 3), 8. Laptop-style
gauge case, 9. DM-2 digital gauge with NiMH
rechargeable batteries, 10. 20 ft (7 m) umbilical,
11. 12.5 ft Flex Duct, 12. Register Flange, 13. Fan-Top
(120v/60Hz), 14. DucTester QuickGuide,
15. DM-2 QuickGuide.
8. DM214
9. DM221
10. DM227
2. DU154
3. DU155
11. DU156
12. DU157
1. DU200
13. FN140
7. GR113
14. QG130
15. QG100
6. TL118
5. TU119
4. PT103
QuickGuide
The DM-2 has two independent differential-pressure
sensors (Channel A and B) and an automatic controller that
will control all Retrotec fans.
Channel A always displays the pressure difference between
the blue “Input A(+)” and the red “Ref A(-)”. “PrA” on the
screen refers to Pressure on channel A.
Channel B similarly measures pressure between “Input
B(+)” and “Ref B(-)”. This pressure is converted to flow or
other units when a Device and Mode is selected. See Page 4
to change the enabled Devices and Modes.
The DM-2 contains:
1 ― DM-2 Gauge
4 ― AA NiMH rechargeable Batteries
1 ― AC power adapter
1 ― Laptop-style case
1 ― Computer interface cable (mini-USB to USB)
1 ― Color coded set of tubes and connectors
1 ― Ethernet cable to connect to Device
● 4 AA NiMH rechargeable batteries are supplied.
● Install by removing the lower compartment cover on
the back of the DM-2.
● Fully charge the batteries on first use, but avoid
prolonged charging.
● Press [On/Off] and the Retrotec screen shown
below appears.
Note: The DM-2 will not start charging unless it is
turned On.
● The batteries are fully charged when the indicator is
solid black.
● Non-rechargeable batteries can be used. To protect
the DM-2 from damage, press [Setup], scroll to
“Battery Type” and select “Rechargeable” or
“Not Rechargeable”. Press [Exit] to save selection.
Note: If “Not Rechargeable” is selected, no recharging
will occur.
Warning:
Non rechargeable batteries may explode
if charged. Only charge rechargeable NiMH batteries.
Follow steps 1-15 to learn the basic gauge functions.
DM-2 mark II Digital Gauge
For the latest Retrotec documentation, visit us at: http://www.retrotec.com
Step 1:
Batteries
QG100
rev-2011-04-04
Page 1 of 4
www.retrotec.com Support:(604)732-0142 Sales: (855)738-7683 Made in Everson, WA USA
www.retrotec.com Support:(604)732-0142 Sales: (855)738-7683 Made in Everson, WA USA
QG130
Page 1 of 8 rev-2012-02-06
Note: Using a supply register, far
from the return, will yield the
leakiest results. Plenum is best.
Pink denotes pressurization
QuickGuide
Model 200 DucTester