The first step – GoPro Max Lens Mod 2.0 Manual del usuario
Página 2
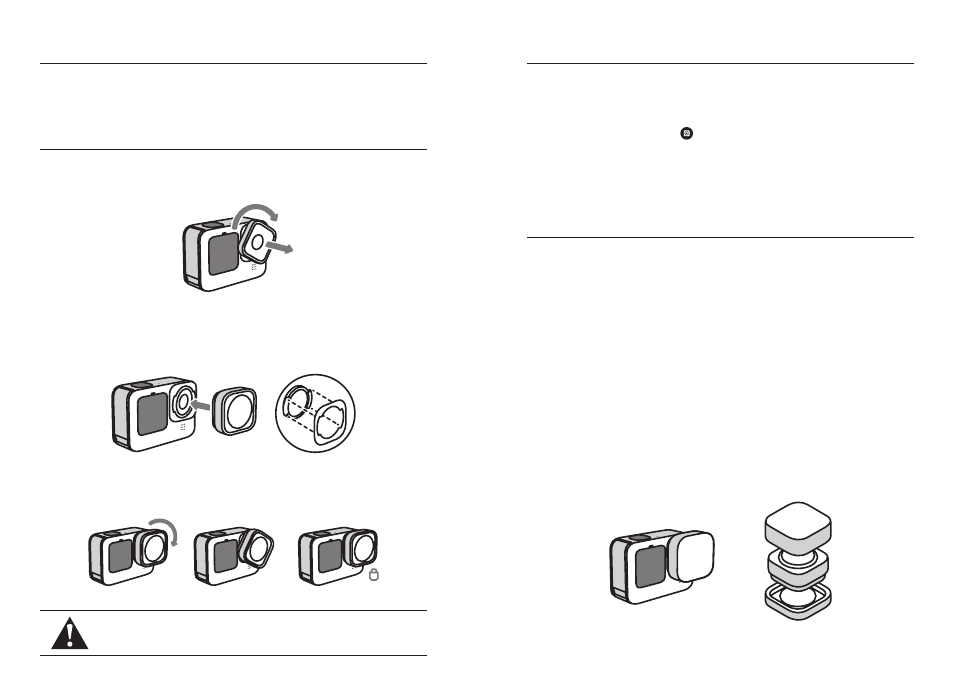
1. Remove the HERO9 Black protective lens by turning it one quarter turn in
either direction.
2. Place Max Lens Mod over your camera’s lens (make sure that the
camera’s mounting plate is properly lined up with the slots on the back
of the Max Lens Mod mounting plate).
3. Press and rotate one quarter turn clockwise to lock it in. Make sure that
Max Lens Mod is properly installed and sealed before using your camera.
TECH SPECS
The Max Lens Mod upgrades HERO9 Black with Max HyperSmooth stabilization,
an ultra wide 155° digital lens, and horizon lock.
There are fewer presets when using Max Lens Mod than there are when using
HERO9 Black in its standard lens.
You can hide Max Lens Mod icon on the dashboard.
1. Swipe down on the rear touch screen to access the dashboard.
2. Swipe right and then tap Preferences > Mods > Max Lens Mod.
CARE
The large protective cap can be used as a lens cover when Max Lens Mod is
installed on your camera. Use the small cap to keep the standard HERO9 Black
protective lens safe and clean when you’re not using it.
Use the included cleaning cloth to keep Max Lens Mod free from smudges and dirt.
Your camera must be in Max Lens mode before recording, otherwise your
footage will be distorted.
1. Swipe down on the rear touch screen to access the dashboard.
2. Tap the Max Lens Mod icon .
Heads up:
Remember to tap out of Max Lens Mod mode if you switch back to
the regular lens. Using the regular lens in Max Lens Mod mode will also distort
your footage.
Installing Max Lens Mod
Tips for Using Max Lens Mod
Max Lens Mode
WARNING:
Only remove the protective lens in a dry, dust-free
environment. Do not touch the glass camera lens when installing
Max Lens Mod.
You may need to upgrade your camera’s software before you can use
Max Lens Mod. For step-by-step instructions, go to
gopro.com/update
.
The First Step